Friday, August 28, 2009

Buttons Galore!

I have always liked the look of buttons on cards, and had a small collection of nice buttons, but when I purchased Papertrey Ink's new Everyday Button Basics set, I realized I needed more buttons! So, I purchased a few sets of their colored buttons, and that led to a need for the perfect storage solution!

I picked up this set of storage jars from Making Memories and this KI Memories dot paper was the perfect match. I covered the box the jars were packaged in with the patterned paper and painted a Grungeboard label holder to match one of the colors in the paper. I used my JustRite stamps to create the label and added a couple of brads before adhering it to the box.

I added a handle to make it easier to move around, since my counter space is pretty limited. I cut a sheet of dark blue Stardreams metallic paper and affixed to the front and back of the box using brads, so it will move left and right to allow easy access to all of the jars. It's worked out great so far, except I 'need' more colors of buttons, so I may have to make a second one!

Hope you've had a good week! Thanks for looking!

Saturday, August 22, 2009

Hey there, chickadee

This week my niece turned 16 - where does the time go? I remember her toddling around like it was yesterday and now she's driving!

I wanted to use Papertrey Ink's Everyday Button Basics set for her card, and selected this owl paper from Best Creations to go with the little chick. I stamped the bird and grass images and then airbrushed the cloudy sky before adding the button for the bird's body. I used some black Stickles to make her eye. The ribbon is May Arts white silk ribbon and I made the double bow with the Bow Easy.

That's about it! Have a great weekend and thanks for looking!

Wednesday, August 19, 2009

Belli Challenge - Peachy Keen Stamps

Happy Wednesday! Hope your week is going well so far! Today is another Belli Challenge and this week our challenge is to use water based markers - NO Copics! Uggghhh - now that really is a challenge, as I learned the hard way! Our challenge this time is sponsored by Peachy Keen Stamps and the winner will receive a $25 gift certificate from Peachy Keen.

Each of the Belli design team members was provided three Peachy Keen images to choose from for this challenge. I selected Sleeping Teddy and decided to make a baby card with a vintage feel. The designer papers I used are from Graphic 45 (Baby and Bride Collection - Unforgettable) and Stampin' UP! (Juntos). My card layout is based on 2 Red Bananas' sketch from Sunday.

I colored the image with Stampin' UP and Zig Beach House watercolor markers and added some sparkle with a clear Spica pen on the hat, blanket and star. The diaper is covered with Doodlebug Designs flock and I added a Tim Holtz mini safety pin. The ribbon is American Crafts Elements.

Be sure to check out what the other Belli Challenge girls have done with these cute images:


To play along with us, create a card or project using only WATER BASED MARKERS ~ NO COPICS, and share your link with us using Mr Linky below today's Belli Challenge post. We can't wait to see what you come up with! If you post to SCS, PCP or any other online gallery please use keyword CBC72 so we can find it.

Monday, August 17, 2009

Soaring by to say Hi!


I am loving the Everyday Button Bits set from Papertrey Ink. It's fun to rummage through my stash of buttons to find just the right one to go with each image in the set. Papertrey Ink's Vintage Buttons are especially nice, fun buttons.

For this card, I've used Summer Sunrise, Enchanted Evening and Scarlet Jewel buttons. The background of the image panel was airbrushed using a Copic marker and torn Eclipse masking paper to make the clouds. The circles in the designer paper, which is from KI Memories, reminded me of the buttons. Not much to it, just a fun little card to brighten someone's day!

Hope you had a nice weekend! Thanks for looking!

Thursday, August 13, 2009

Happy Birthday Seahorse (CAS27 and FTTC28)

A good friend, and fellow diver, is having a birthday this week, so I made this seahorse birthday card for him. I had yet to use any of Stampin' UP!s new In Colors, so I pulled out my Bermuda Bay and Crushed Curry markers and textured card stock for this card. I colored the seahorse, from SU's Ocean Commotion set, all over with the Crushed Curry marker and then pounced the Bermuda Bay marker on top before I stamped the image.

I added alternating dots of the two colors around the border of the Nestabilities Labels Four die and layered that on a Crushed curry mat that was cut using a Labels Three die and then layered that on a Bermuda Bay mat cut using the next larger Labels Four die.

The background paper was made by inking my Cuttlebug Mesh Texture Embossing Folder with a Kaleidacolor Caribbean Sea inkpad before embossing the paper. I had a small strip of it leftover, so I matted it and used it on the front of the envelope. I added some score lines across the bottom, leaving space for my sentiment, and one at the top. I added a few rhinestones on either side of the main image and the sentiment and one for the seahorse's eye.

This was a quick and easy card and qualifies for this week's Clean and Simple challenge (CAS27)at Splitcoast Stampers, which is to add bling, as well as for this week's Flourishes Timeless Tuesday challenge (FTTC28), which is to score it.

Hope your week is going well! Thanks for looking!

Tuesday, August 11, 2009

Birthday Wishes

This is a fun little birthday card and envelope that I made last week for a friend. I am just loving this Everyday Button Bits set from Papertrey Ink! And I just noticed this is the third card I've posted using this Lavish patterned paper from Fancy Pants' Aged Florals line - I will be sorry when the last of it is gone, but am happy that I am using my scraps.

I stamped the leaves and sentiment with Memento Bamboo Leaves, and the grass was stamped with VersaMagic Tea Leaves chalk ink. I also stamped the image on some green paper and cut out a few of the leaves and added them to give a little dimension.

I spent a little time picking just the right buttons from my collection of Papertrey Ink's Vintage buttons (I used New Leaf, Scarlet Jewel and Summer Sunrise) and getting them placed properly, then I sewed them directly on the paper. I am embarrassed to say I sewed more buttons on this card than I have sewn lately for my poor husband....who recently reminded me that he has some shirts that need the buttons replaced...it is not NEARLY as fun to sew buttons on shirts as it is to sew them on a card....sorry, honey!

I used my new Blossom Nestabilities die for the mat and one of the Ribbon Tags Trio dies for the sentiment. The ribbon is from Stampin' UP. The layout is Mojo Monday's Week 96 sketch.

That's about it! Hope your week is going well so far! Thanks for looking!

Saturday, August 8, 2009

More Krafty Kat Goodness!


Several months ago, Jenny provided each of us Krafty Kats with a wooden letter of our first initial, and challenged us to alter it. I really enjoy doing altered projects occasionally so this was a fun challenge. I started out by giving my 'R' a couple of coats of paint to coordinate with the Graphic 45 Botanicabella papers that I was planning to use.

Once it was dry, I figured out which portions of the papers and coordinating tags I wanted to use. I tried to select ones that were significant to me, since the letter represents my name. I chose the seahorse and some of the sea elements to represent my love of diving, the grapes for my love of wine, the artichoke tag for my love of .....well..., artichokes, and the butterflies and dragonflies because I love them, too! I also selected a couple of butterfly brads that I have been hoarding for a long time. I cut the papers to fit the different sections of the letter and adhered them using decoupage glue. Once all the papers were in place, I went over the whole thing with one more coat of the decoupage glue to seal it up.

Since the artichoke tag had slots in each end, I needed some ribbon. Even with my somewhat significant stash of ribbon, I wasn't able to find one that was 'just right', so I whipped out my wide ivory silk ribbon from Sharon's ribbon store and proceeded to airbrush it with a Copic marker! It gives the ribbon a softer, more tie died look than taking the marker straight to the ribbon. But, you've gotta hold on to that ribbon, or the airbrush will blow it all over the place!!!

After I posted my Belli Challenge card on Wednesday, I realized I could have used this project as my sample for that, too. So, to my fellow Krafty Kats, if you haven't altered your letter yet, and to anyone else out there with a fun, alterable wood item, dress it up and enter it in the current Belli Challenge!

Thanks for looking! Have a great weekend!

Wednesday, August 5, 2009

Creative Belli Challenge - Wood


Happy Wednesday! It's time for another Creative Belli Challenge! This week's challenge is to incorporate wood in your project. You can use a wood grain background stamp, wooden embellishments, sticks, a stamp of a wooden image or wood grain paper - whatever you have! If you would like to play along, please post your creation using Mr. Linky on today's post over at the Creative Belli Challenge!

For my card, I started out with the wooden butterfly from Kaisercraft and then figured I'd add the wooden tag from Judy's Stone House Designs Creative Laser Wood Accents for good measure! Next I settled on last week's SC237 sketch over at Splitcoast Stampers, and finally, I selected the Making Memories Flower Patch paper collection for my patterned papers, Prism Teal card stock for the card base and mat layers and KI Memories Bloom Tulips Surreal Frost Lace for the strip across the middle

I inked the edges of the butterfly and the tag with Versacolor Old Rose ink and added some Patina and Fruit Punch Stickles to the butterfly's antennae and wings for a little extra interest. The sentiment is from Cornish Heritage Farms' Script Essentials Expressions set.

I think that about covers it. Hope you are having a good week! Thanks for stopping by!

Sunday, August 2, 2009

CHF Summer Stamp Star - Challenge 5 - One Sheet Wonder

Brace yourself, this will be a long one...This is the last week of Cornish Heritage Farms' Summer Stamp Star Contest. The challenge for this week was One Sheet Wonder. For those of you who are not stampers or card makers, One Sheet Wonder means that you create your own sheet of patterned paper (either 8 1/2 x 11" or 12 x 12") using rubber stamps, and then you make something using up as much of that sheet of paper as possible.

So, here is where I started...my one sheet (not exactly a) wonder...

I used CHF's Nature's Silhouettes set and various shades of Versamagic chalk inks (Pumpkin Spice, Tea leaves and Wheat), Adirondack Caramel Dye Ink and Brilliance Cosmic Copper ink to make my One Sheet Wonder on SU Whisper White card stock.

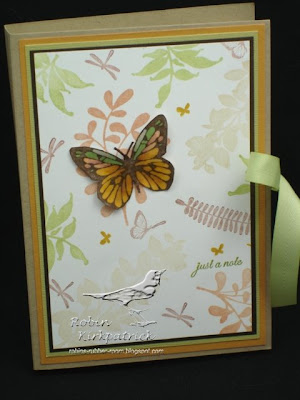
I used the All Boxed Up template, one of the Timeless Templates available from Papertrey Ink, to create a card folder to hold four cards and envelopes. I made the folder out of Kraft card stock and layered a section of my hand made patterned paper on top. I added the 'just a note' sentiment and stamped one of the butterflies from the Vintage Butterflies set on Whisper White using Memento Rich Cocoa dye ink. I colored the butterfly with Copic markers and cut it out. I covered it with Ranger Glossy Accents to give it some shine and stability. When it was dry, I adhered it to the front of the folder.

Here is a photo showing the whole kit and kaboodle - the open folder and all four cards. There are two get well cards, one sympathy card and one generic card. For the inside of the folder, I made each of the pockets out of Kraft card stock and then stamped them with the Nature's Silhouettes images, and one of the butterflies.


This card was made using the Mojo Monday week 97 sketch. I used a small strip of my patterned paper on the bottom, the large butterfly from Vintage Butterflies, stamped with Cosmic Copper ink and clear embossed. Each of the Certainly Celery layers was paper pierced around the edge. The buttons were sewn on using twine and the flourish in the corner was made using a Spellbinder's Floral Accents die. While the paper was still in the die, I rubbed some copper metallic rub on paste on the embossed parts.


This card was made using Card Positioning Systems' CPS125 sketch. Once again I used a small strip of my patterned paper and matted with two layers of card stock that were cut on the right side using a Martha Stewart border punch. I wanted to use the border punch on the bottom Certainly Celery layer, too, but then I wouldn't have had a place to anchor my brad for my sentiment, so I left it alone.
The left top and bottom corners of the two mat layers were cut using a corner rounder punch. I used another butterfly from Vintage Butterflies for this card, as well as some Mango Kaisercraft self adhesive pearls. All sentiments are from CHF's Script Essential Expressions set. It's a wonderful set containing 55 beautiful script sentiments.

This card was made using the Clean and Simple FTL 52 sketch. I stamped some of the same images from my background paper on the Kraft card stock, using Adirondack Snow Cap pigment ink, and the same inks I used on the background. The sentiment was cut out using a Spellbinders ribbon tag. The flowers are from Prima and the brad is from Basic Grey.

This last card was made using CHF's The Bee List stamp, which was stamped on Rustic White card stock and colored with Copic markers. I stamped it a second time and cut out the bees and the flower and colored them with Copics and Spica glitter pens and mounted them on top of the main image for some additional dimension. The ribbon is SU's Certainly Celery herringbone ribbon, which I also used on the folder to tie it closed.

Whew! This has been a GREAT challenge and I'm so glad I participated in it. I have really stretched myself in a number of ways and it has been very rewarding.

Thanks for hanging in there with me! Hope you've had wonderful weekend!